Many of our customers on their migration journey love using Rimo3 the traditional way via our web portal. The portal provides you with real time access to their application data.
However, as customers mature with the platform and reach the end of their migration, they are now thinking about how they can integrate Rimo3 into their BAU processes.
Customers use IT Service Management (ITSM) tools and processes to manage change in their environment. It is important that Rimo3 is extensible and can easily integrate into any customer process.
In this tutorial we will help you build the foundations of Continuous Integration/Continuous Delivery (CI/CD) pipeline for your Application Lifecycle Management (ALM) using Rimo3 API.
Rimo3’s Latest API Release
On the December 18, 2023, our latest release, Euphrates, went live.
Included in Euphrates are some updates to our Application Programming Interface (API) that will enable you do more automation and integration with the Rimo3 platform:
- Ability to generate and download reports.
- Enhancing the download and export API endpoints.
- Enable API actions to be performed against all packages irrespective of their discovery status.
- Updates to the Environment Management API to support flexible OS selection.
- Upload APIs enhanced to complete support for breaking apart the onboarding pipelines.
- Testing APIs enhanced to complete support for breaking apart the onboarding pipelines.
To learn more about the exciting new features included in this update head over to our Feature Releases page.
What is the Rimo3 API?
The Rimo3 API is a collection of endpoints that can perform the same functions presented in the Rimo3 web portal Graphical User Interface (GUI). Whether developer or non-developer, you can use these endpoints to create customized processes or integrate into existing processes where human interaction is not required.
For example, you could create a Rimo3 integration into an application update process. The process would be triggered via the Rimo3 API that onboards and tests the new application update against your Windows OS.
Another example would be that there is a Windows OS update that you need to deploy, and you want to automate the testing of your applications against the update before deploying.
3 Main Benefits of the Rimo3 API
There are many benefits to using the Rimo3 API versus the Rimo3 GUI, such as:
- Flexible and Customizable: APIs are more flexible and customizable than GUI interfaces. Developers can create custom software that integrates with other applications and services. This can be particularly useful for businesses that need to share data between different systems.
- Faster and More Efficient: APIs are more efficient than GUI interfaces when it comes to handling large amounts of data. They can process data much faster than a GUI interface, which can be especially important for applications that require real-time data processing.
- Automation: APIs remove the need for human interaction with the platform and therefore allow for end-to-end automation of processes.
To learn more about how the Rimo3 APIs presented here could be leveraged to create a fully automated CI/CD ALM pipeline, check out our blog post on embracing change enablement.
How To Utilize the Rimo3 API
For this tutorial, we’re using PowerShell to interact with the various API endpoints available at time of writing.
As we release more API endpoints, we’ll continue highlighting new capabilities and opportunities. Before exploring the API, here are some key prerequisites you’ll need to start your testing.
- A live Rimo3 tenant that’s been deployed to an Azure subscription
- An AppID and Client Secret to generate Access Tokens (AT). These are provided on demand.
Step 1: Obtain an Access Token
Start by assigning the AppID, Client Secret, and Server URI to variables.

Next, build out the Body, Header, and Parameter JSONs used to invoke the AT request.
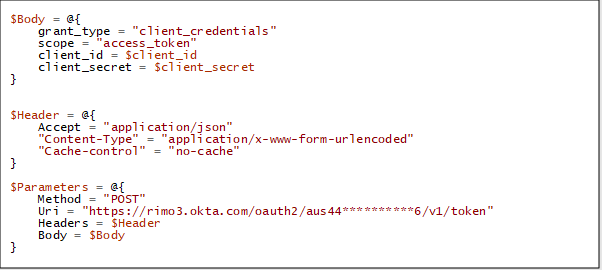
Next, request an AT and assign it to a variable.

The AT request returns a JSON response containing the required Access Token. You can finally pull this out of the JSON and assign to a variable to use in API calls.

Step 2: Setup Connections to System Center Configuration Manager (SCCM) and Intune
Rimo3 enables you to create multiple connections to both SCCM and Intune, you can mark each with an identified friendly name.
To setup a connection to SCCM, ensure you set up line of sight to SCCM from the Rimo3 VNet. Provision an identity with the Read-Only Analyst role in SCCM that also has Read-Only Access to the source media folder.
Now, you can pass this information into the SCCM Connection API.

Rimo3 requires the connection ID to trigger the import of applications via the SCCM connection. This is why you assign the ID value from the result to a variable.
From here, pass this variable to the Import Applications API endpoint.
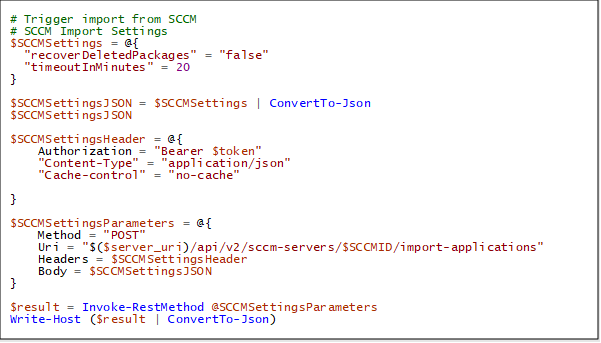
The output provides a Sequence ID that tracks the import’s progress, either via the API or the console directly.

Later in this tutorial, you’ll use the “Sequences API” endpoint to track progress of an application going through the Rimo3 pipeline.
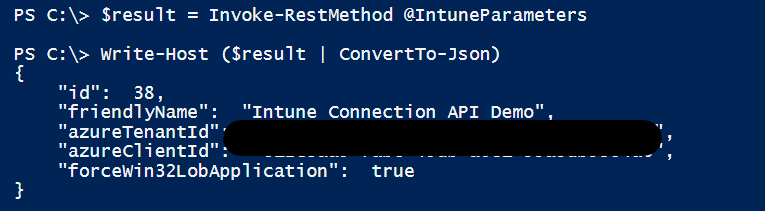
To set up the connection to Intune, you must first create a Service Principal (aka Application Registration) within Entra-ID (aka Azure Active Directory (AAD)). The Service Principal requires admin approval of the required Graph API permissions to create Intune Application Objects, (i.e., scoping the Service Principal using least privilege methodology.):
- DeviceManagementApp.Read.All
- DeviceManagementApp.ReadWrite.All
To create the Intune connection in Rimo3 you must pass the following:
- Tenant ID
- Application (Client) ID
- Client Secret
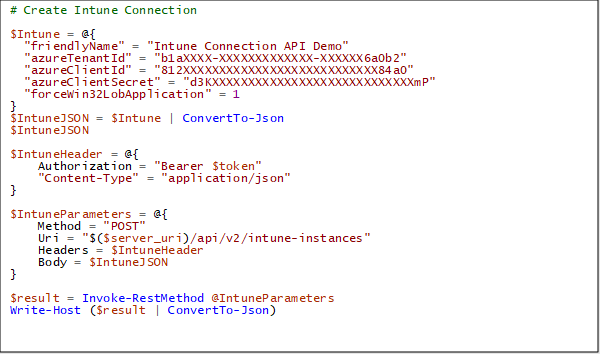
Later in this tutorial, you’ll use the Intune connection you added to create a new Intune Win32 application.
Step 3: Add Your First Application
Whenever Rimo3 provisions a new customer tenant, it always tests the upload and onboarding of a simple application.
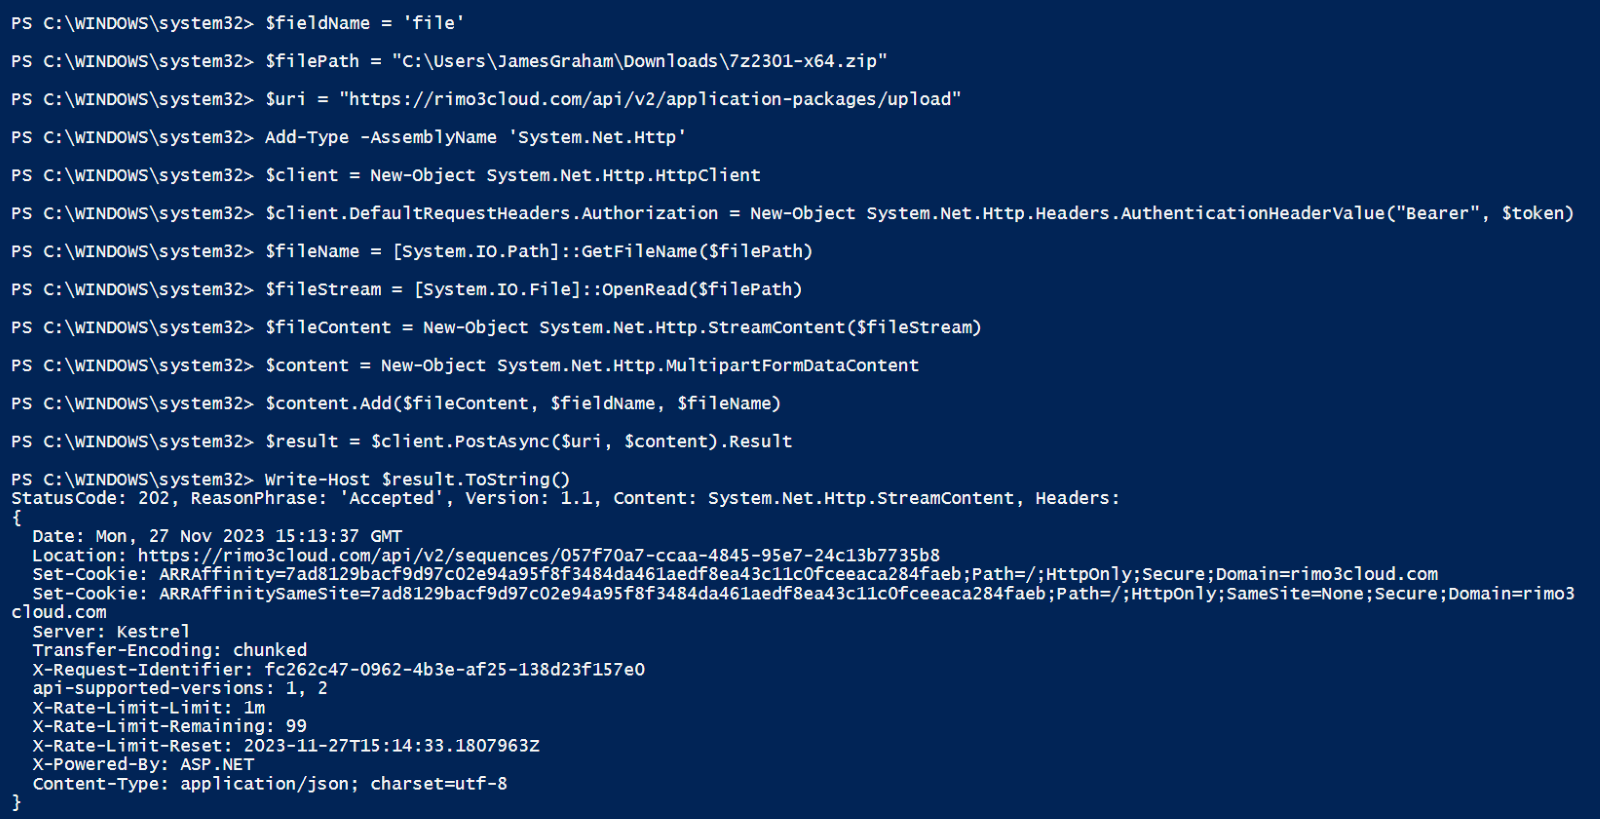
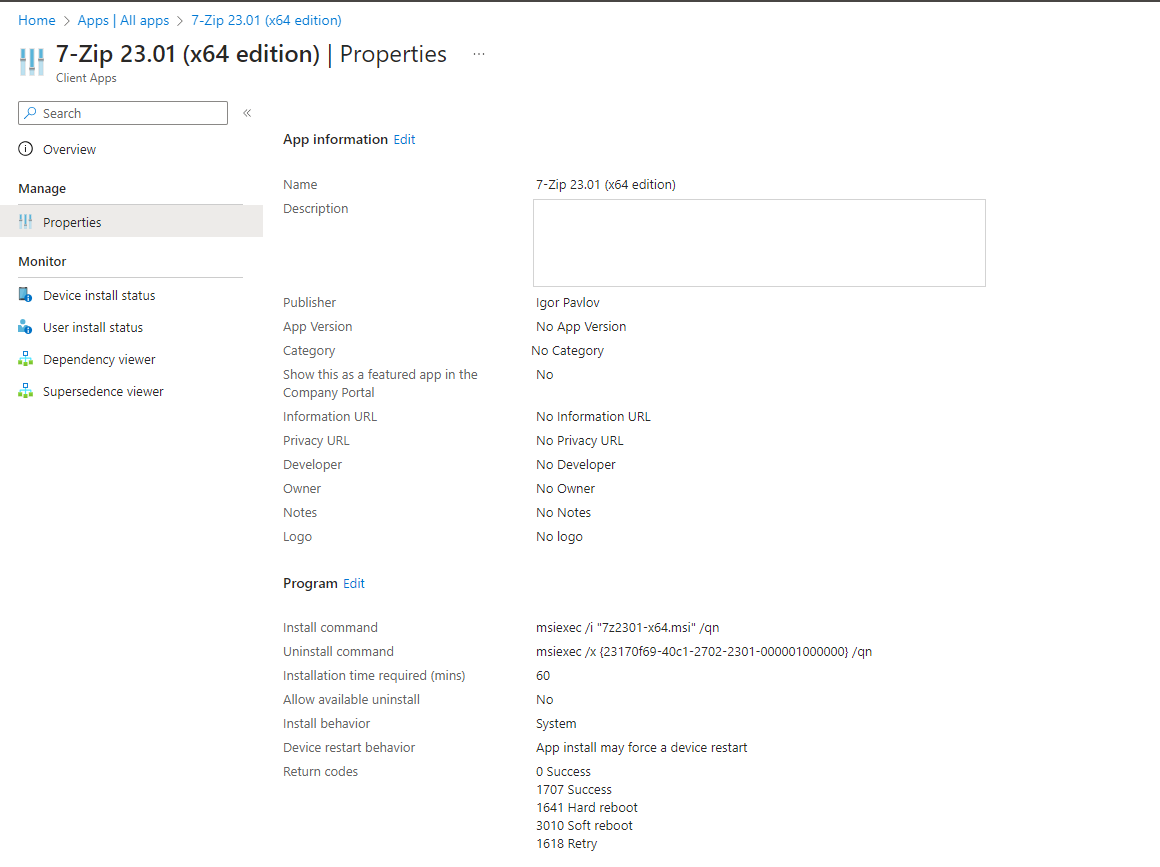
For example, you’ll use the API to upload, onboard, and test 7Zip. First, locally download the MSI and compress it to a zip file. Once complete, call the application upload API while providing the file path of the created zip file.
While this is a simple activity, there is a challenge. You must convert the file path to a file stream, hence the need for multiple lines of PowerShell.

After completing, you’ll receive feedback on the success of the upload, which also includes a Sequence ID to track the upload progress.
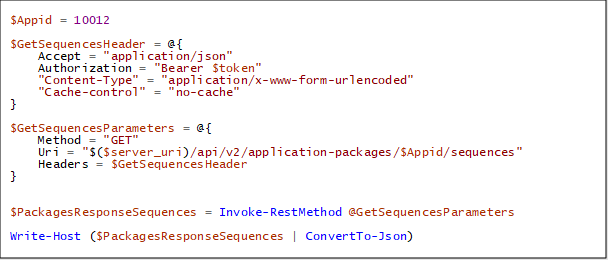
Step 4: Identify the Application ID
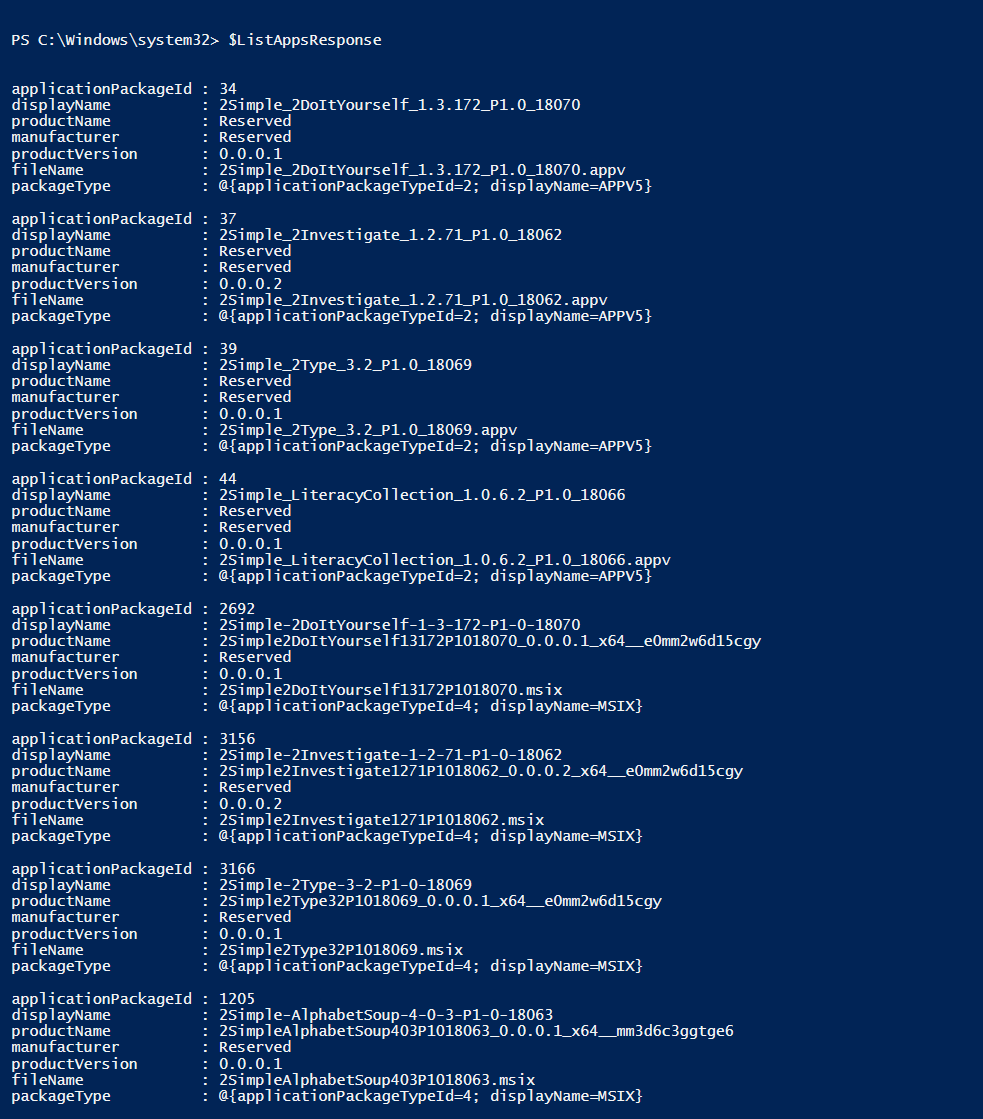
To track the application progress, you must first obtain the assigned Application ID when the application has completed the upload.
To achieve this, you can list the applications currently onboarded to your Rimo3 tenant to locate application you uploaded.

This will output all application packages currently onboarded to the Rimo3 tenant.
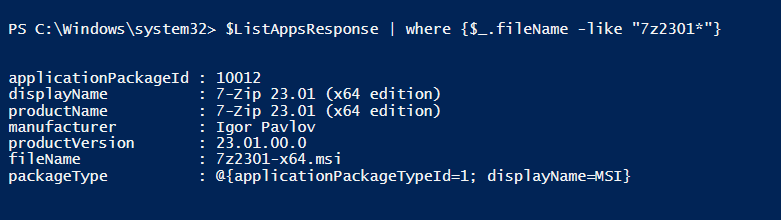
You’ll need to narrow these results down to identify the Application ID of the application we just uploaded. Use the following command to filter the results on the filename we used.
![]()
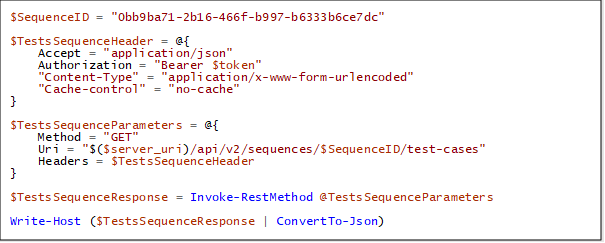
Step 5: Track Progress of Discovery, Baseline, and Test
Now that you have the Application ID for the uploaded application, you can use this to track the progress of the various stages of the journey that Rimo3 takes the application through.
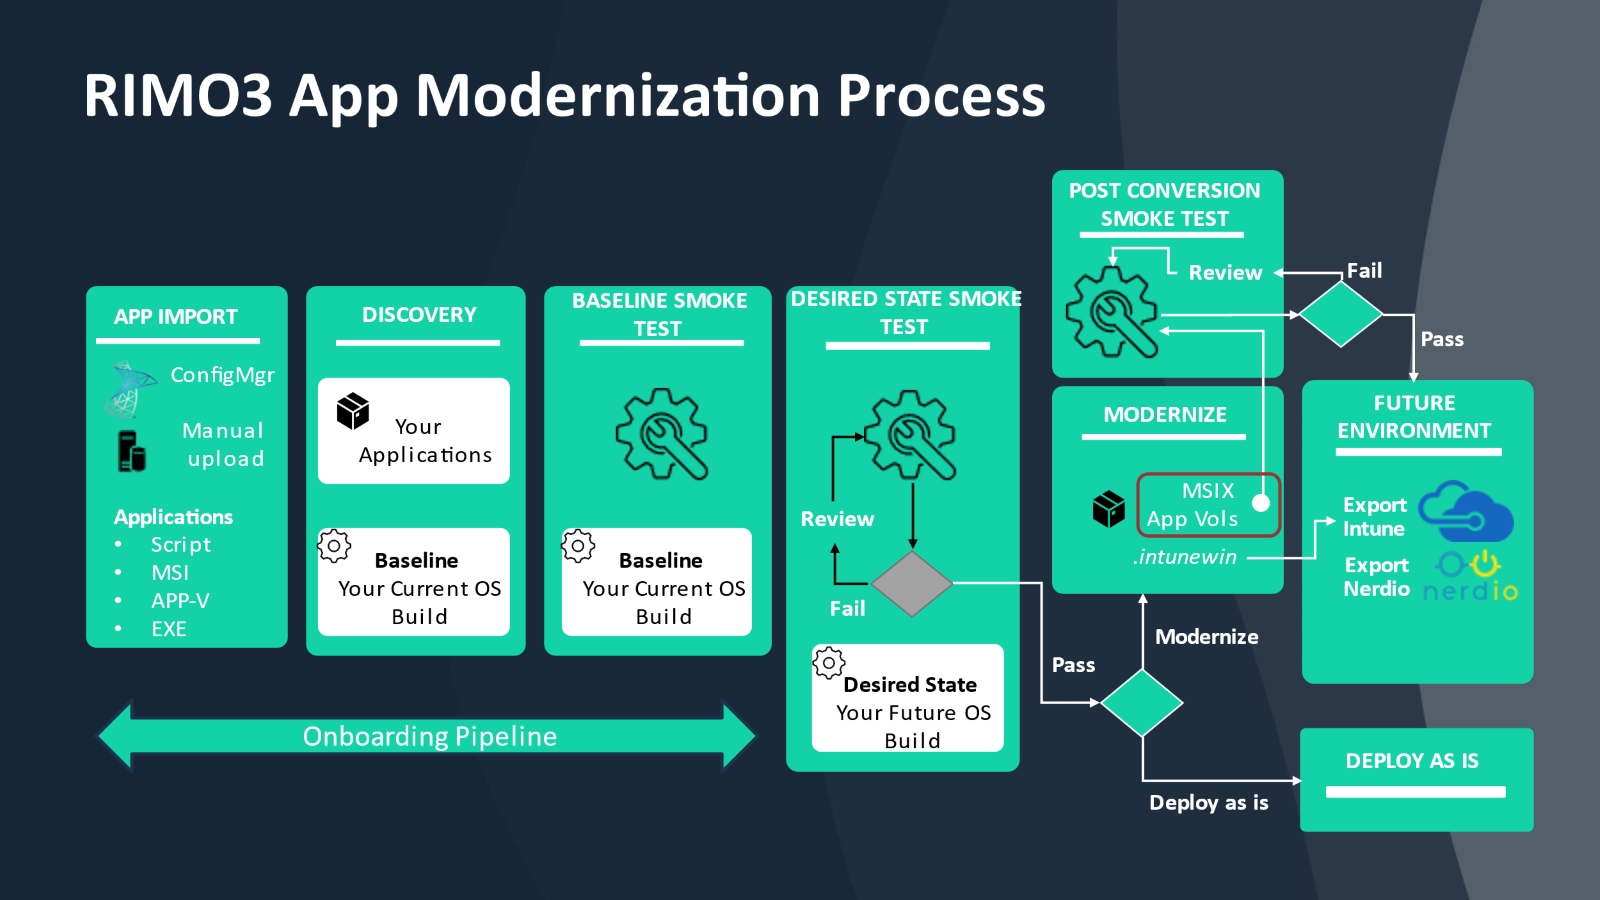
In this step, you get a list of sequences associated with the Application ID.
You’ll receive the associated pipeline sequences for the newly uploaded application. As shown below, it works its way through the pipeline, passes discovery, and is eventually baselined.
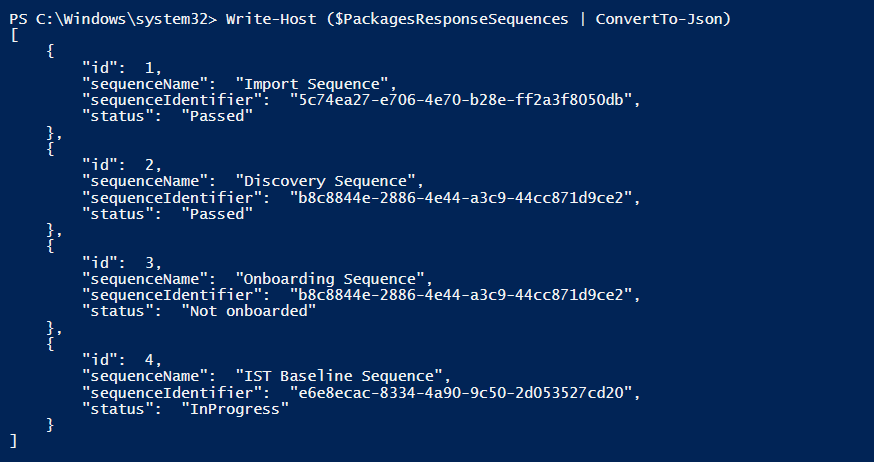
You can run the same commands again to show the continued progress.
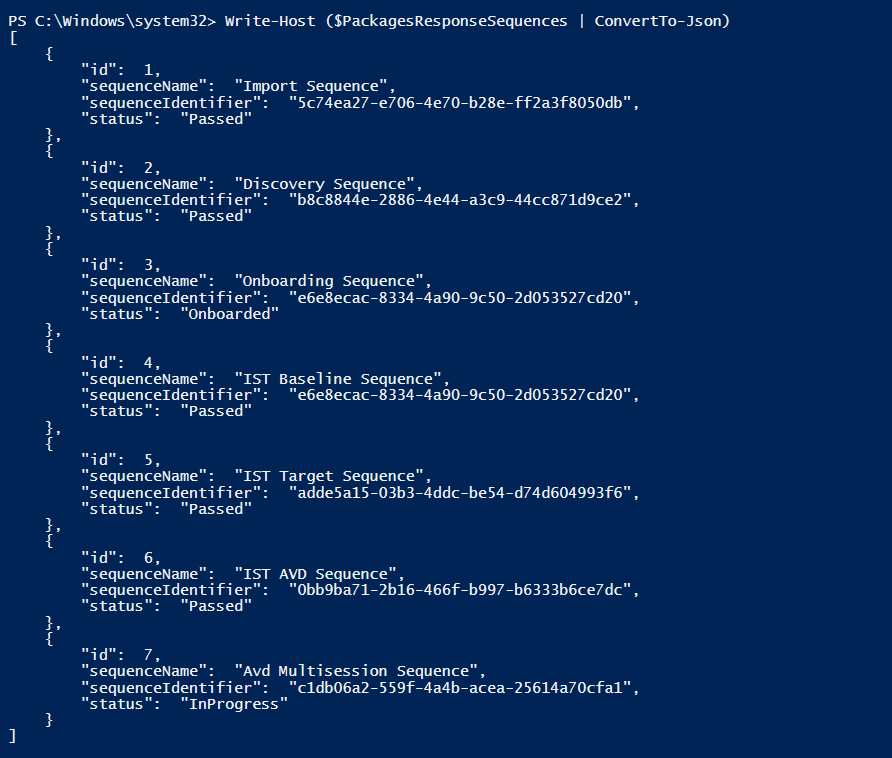
You can see that the onboarding is now complete, and your application is now being tested against desired state, including AVD multisession.
For any of the sequences provided, you can use the Sequence ID to obtain more details.
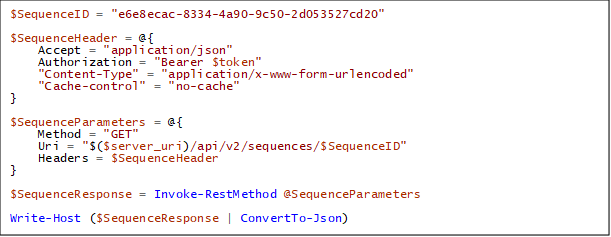
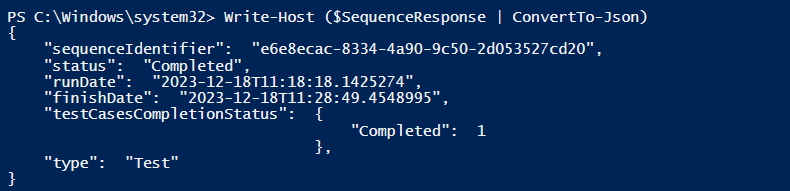
You can go one step further by obtaining the test case details for a given sequence.

Once all tests are complete, you can review the results and modernize the application.
Step 6: Convert to MSIX
After completing application onboarding and testing against your desired OS, you can initiate the process of converting the application to an MSIX.
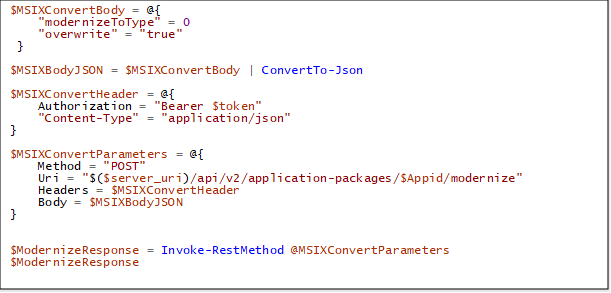
If you want to capture the same application as a VMware App Volumes package, then simply change the "modernizeToType" variable from 0 to 1.
This returns a Sequence ID that you can use to track the progress of the conversion process.
Step 7: Export to Intune
The final step is for you to export the application as a Win32 (.intunewin) application to the Intune tenant you connected to Rimo3 earlier. You can either use the original application format (MSI) or the application ID of the MSIX version you created in the previous step.
To begin, identify the Intune instance you’d like to use.
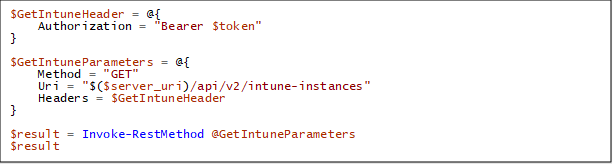
From the results, identify the Connection ID and pass that to the export application to Intune command.
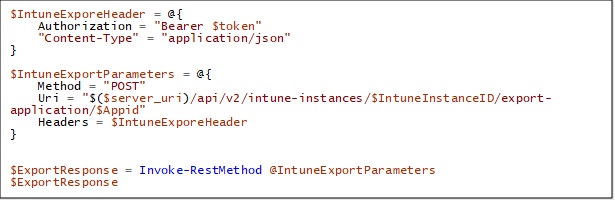
The output is a trackable Sequence ID. You can use this to track your application being wrapped as an "intunewin" and added to your Intune tenant as an assignable Win32 application object.
Leverage Your Application Automation With Rimo3
Application Lifecycle Management (ALM) can be extremely time consuming for organizations with complex environments and a high number Windows applications.
By leveraging automation, organizations can make significant savings to time and thus cost, but also reduce risk and complexity.
At Rimo3 we pride ourselves on applying automation to the complexity of ALM thus enabling you to transform traditional rollout project activities to simply being a day-to-day activity.
In this tutorial we leveraged the Rimo3 API to enable you to perform the following activities:
- Obtaining an Access Token
- Setting up SCCM and Intune connections to the Rimo3 tenant
- Uploading a simple application to Rimo3
- Tracking your application’s progress through Discovery, Baseline and Test
- Converting your application to an MSIX package
- Exporting your application to Intune as an assignable Win32 application.
You now have the initial building blocks to create a fully automated ITSM process for application and OS change enablement with Rimo3.
Schedule a demo session with Rimo3 now to get started on your journey towards an automated ITSM ALM pipeline.